操作场景
无桌面系统需要使用代理,可以解决无法克隆GitHub项目、Docker拉取镜像慢等问题。本教程只配置TUN模式,不配置系统代理!
环境说明
- 操作系统:debian 13.6 (无图形界面)
- 系统架构:amd64
- 核心软件:Mihomo alpha-e183c58
- 前置面板:MetaCubeXD 1.271.0
安装Mihomo内核
两种安装方式,第一种使用二进制文件需要配置Systemd后台服务,第二种使用deb包则不用,可以按照需求选一种。
1
2
3
4
5
6
7
8
9
10
11
12
13
14
15
16
17
18
19
20
21
22
23
24
25
26
27
28
29
30
31
32
33
34
35
36
37
38
39
40
41
42
43
44
45
46
47
|
第一种安装方式:

# Mihomo的github网址: https://github.com/MetaCubeX/mihomo/releases
#可以根据最新的或预发布版本号进行下载,本文直接使用了预发布版本

wget "https://github.com/MetaCubeX/mihomo/releases/download/Prerelease-Alpha/mihomo-linux-amd64-alpha-99ce79c.gz" -O mihomo.gz
gunzip mihomo.gz
sudo mv mihomo /usr/local/bin/mihomo
sudo chmod +x /usr/local/bin/mihomo
sudo mihomo -v                    # 预期输出版本号,确认安装成功


#配置Systemd后台服务

vim /etc/systemd/system/mihomo.service

[Unit]
Description=mihomo Daemon, Another Clash Kernel.
Documentation=https://wiki.metacubex.one
After=network.target nss-lookup.target network-online.target

[Service]
Type=simple
LimitNPROC=500
LimitNOFILE=1000000
CapabilityBoundingSet=CAP_NET_ADMIN CAP_NET_RAW CAP_NET_BIND_SERVICE CAP_SYS_TIME CAP_SYS_PTRACE CAP_DAC_READ_SEARCH CAP_DAC_OVERRIDE
AmbientCapabilities=CAP_NET_ADMIN CAP_NET_RAW CAP_NET_BIND_SERVICE CAP_SYS_TIME CAP_SYS_PTRACE CAP_DAC_READ_SEARCH CAP_DAC_OVERRIDE
ExecStart=/usr/local/bin/mihomo -d /etc/mihomo
ExecReload=/bin/kill -HUP $MAINPID
Restart=on-failure
RestartSec=10
LimitNOFILE=infinity

[Install]
WantedBy=multi-user.target


第二种安装方式:
# 直接下载deb包安装
wget "wget https://github.com/MetaCubeX/mihomo/releases/download/Prerelease-Alpha/mihomo-linux-amd64-alpha-99ce79c.deb"
sudo apt install ./mihomo-linux-amd64-alpha-99ce79c.deb
mihomo -v                    # 预期输出版本号,确认安装成功

安装成功后输出:
mihomo -v
Mihomo Meta alpha-99ce79c linux amd64 with go1.26.5 Wed Aug  5 23:20:13 UTC 2026
|
配置 Mihomo
配置目录
1
| sudo mkdir -p /etc/mihomo
|
下载主配置文件
1
| curl -L -o /etc/mihomo/config.yaml "你的订阅链接!"
|
如果没有选择Mihomo内核这一个选项,可以直接从 Windows 下的 clash 软件中导出 yaml 文件,再上传到服务器:
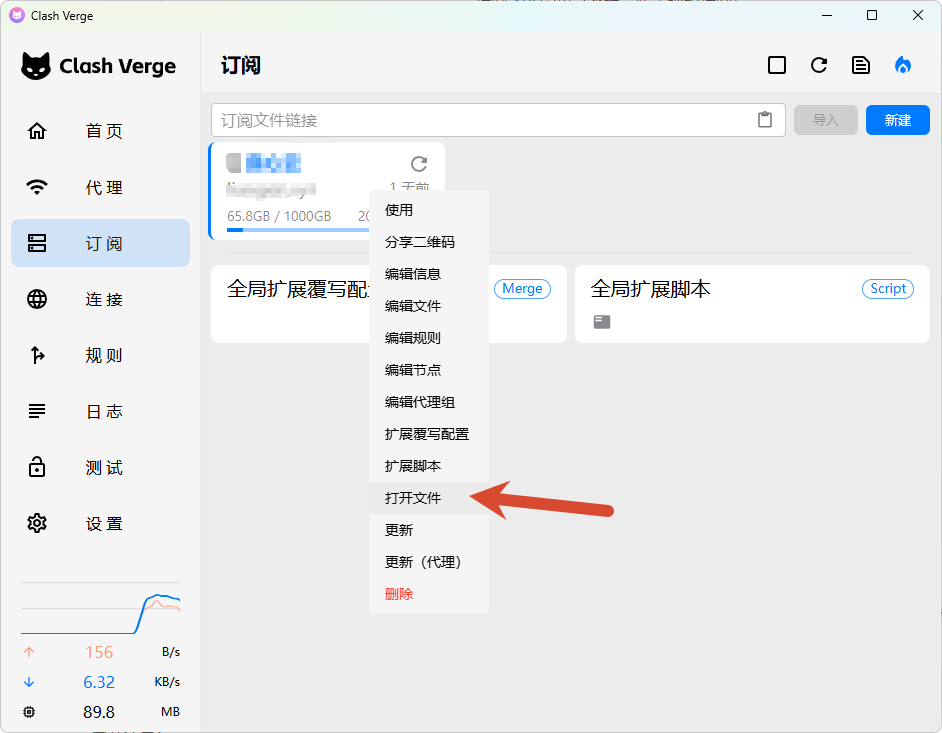
然后就会跳转到对应的 yaml 文件,将此文件上传到服务器:
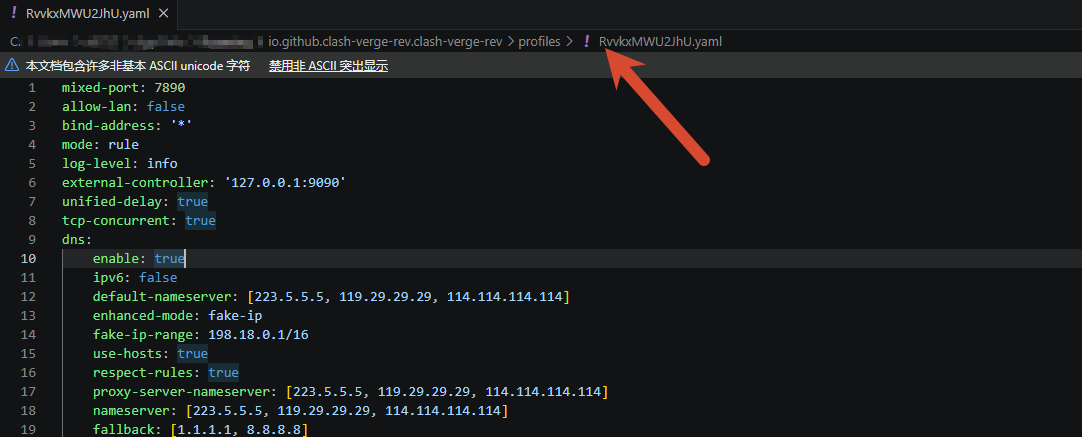
修改 config.yaml 文件中的基础配置
1
2
3
4
5
6
7
8
9
10
11
12
13
14
15
16
17
18
19
20
21
22
23
24
25
26
27
28
29
30
31
32
33
34
35
36
37
38
39
40
41
42
43
44
| (注意:以下配置仅包含 TUN、DNS、sniffer 等基础设置,具体的 proxies、proxy-groups 和 rules 请保留你订阅配置中的内容)
如果有字段冲突,以下面的配置为准:
# 1. 开启外部控制台(方便后续看延迟和切节点)
external-controller: '127.0.0.1:9090' # 允许外部访问控制 API
external-ui: /etc/mihomo/ui # 指定前端面板文件路径,访问地址为 API地址/ui
secret: '你的自定义密码' # 必填!设置一个密码防止别人控制你的代理
# 2. 开启 DNS 劫持(TUN 模式必须配合 DNS 劫持才能完美工作)
dns:
enable: true
listen: 0.0.0.0:53
ipv6: false
enhanced-mode: fake-ip # 强烈建议使用 fake-ip 模式,解析速度极快
fake-ip-range: 198.18.0.1/16
nameserver:
- 223.5.5.5
- 114.114.114.114
- tls://dns.alidns.com
# 3. 开启 TUN 模式核心配置
tun:
enable: true
stack: mixed # 网络栈,推荐 system 或 mixed
dns-hijack:
- any:53 # 劫持所有 DNS 请求
auto-route: true # 自动设置全局路由,接管全部流量
auto-detect-interface: true # 自动识别出口网卡
# 4. 流量嗅探(从纯 IP 的网络包里提取真实域名,让分流规则不失效)
sniffer:
enable: true
force-dns-mapping: true
parse-pure-ip: true
override-destination: true
sniff:
HTTP:
ports: [80, 8080-8880]
override-destination: true
TLS:
ports: [443, 8443]
QUIC:
ports: [443, 8443]
|
密码设置提示:建议使用字母和数字组合,避免使用 '、"、: 等特殊字符,以免 YAML 解析出错。
常用命令:
1
2
3
4
| # 测试配置文件语法(极度常用!每次修改 config.yaml 后务必先执行)
sudo mihomo -d /etc/mihomo -t
# 预期输出:configuration file /etc/mihomo/config.yaml test is successful
|
GeoIP / GeoSite 数据库
Mihomo 启动时会自动下载 geoip.metadb 与 geosite.dat(若目录中缺失)。
受限网络下可以手动下载并上传服务器:
手动预下载到 /etc/mihomo(最稳,避开启动期联网):
1
2
3
| cd /etc/mihomo
curl -L -o geoip.metadb "https://github.com/MetaCubeX/meta-rules-dat/releases/download/latest/geoip.metadb"
curl -L -o geosite.dat "https://github.com/MetaCubeX/meta-rules-dat/releases/download/latest/geosite.dat"
|
启动服务
1
2
3
4
5
6
7
| sudo mihomo -d /etc/mihomo -t
# 预期输出:configuration file /etc/mihomo/config.yaml test is successful
sudo systemctl daemon-reload
sudo systemctl enable mihomo # 开机自启
sudo systemctl start mihomo # 启动
sudo systemctl status mihomo # 查看状态(看到 active (running) 即正常)
|
本地部署面板
1
2
3
4
5
6
| cd /etc/mihomo
wget "https://github.com/MetaCubeX/metacubexd/releases/download/v1.271.0/compressed-dist.tgz" -O ui.tgz
mkdir -p ui
tar -xzvf ui.tgz -C ui
rm ui.tgz
|
修复权限
1
2
| chown -R root:root /etc/mihomo/ui
chmod -R 755 /etc/mihomo/ui
|
有两种访问方案
方案 A:端口暴露
方案 B:nginx 反向代理(推荐生产)
1)改 config.yaml 仅本机监听:
1
| external-controller: '127.0.0.1:9090'
|
2)安装并配置 nginx:
1
2
| apt install -y nginx-full
vim /etc/nginx/sites-enabled/mihomo
|
server 示例:
1
2
3
4
5
6
7
8
9
10
11
12
13
14
15
16
17
18
19
20
21
22
23
24
25
26
27
28
29
30
31
32
33
34
35
36
37
38
39
40
41
| #生产环境建议使用https并配置强跳
#server {
# server_name 域名;
# listen 80;
# return 307 https://$host$request_uri;
#}
server {
server_name _; # 生产建议改为域名;仅用 IP 时填 _
listen 80;
listen 443 ssl;
#使用https时ssl证书路径
#ssl_certificate /etc/nginx/cert/你的域名.crt;
#ssl_certificate_key /etc/nginx/cert/你的域名.key;
client_max_body_size 2m;
proxy_set_header Upgrade $http_upgrade;
proxy_set_header Connection "upgrade";
proxy_http_version 1.1;
proxy_set_header Host $host;
proxy_set_header X-Real-IP $remote_addr;
proxy_set_header X-Forwarded-For $proxy_add_x_forwarded_for;
proxy_set_header X-Forwarded-Proto $scheme;
location / {
rewrite ^/$ /ui break;
proxy_pass http://127.0.0.1:9090;
}
}
#保存退出后启动nginx
sudo nginx -t
nginx: the configuration file /etc/nginx/nginx.conf syntax is ok
nginx: configuration file /etc/nginx/nginx.conf test is successful
sudo systemctl enable nginx
sudo systemctl start nginx
|
3)防火墙或云服务器访问控制放行 Web 端口 80、443
4)访问与面板
- 浏览器打开
http://服务器IP(或 https://域名)。
- API Base URL:
http://服务器IP(方案 B 走 nginx,同源即可,填 http://服务器IP 或域名)。
- Secret:config.yaml 中设置的密码。
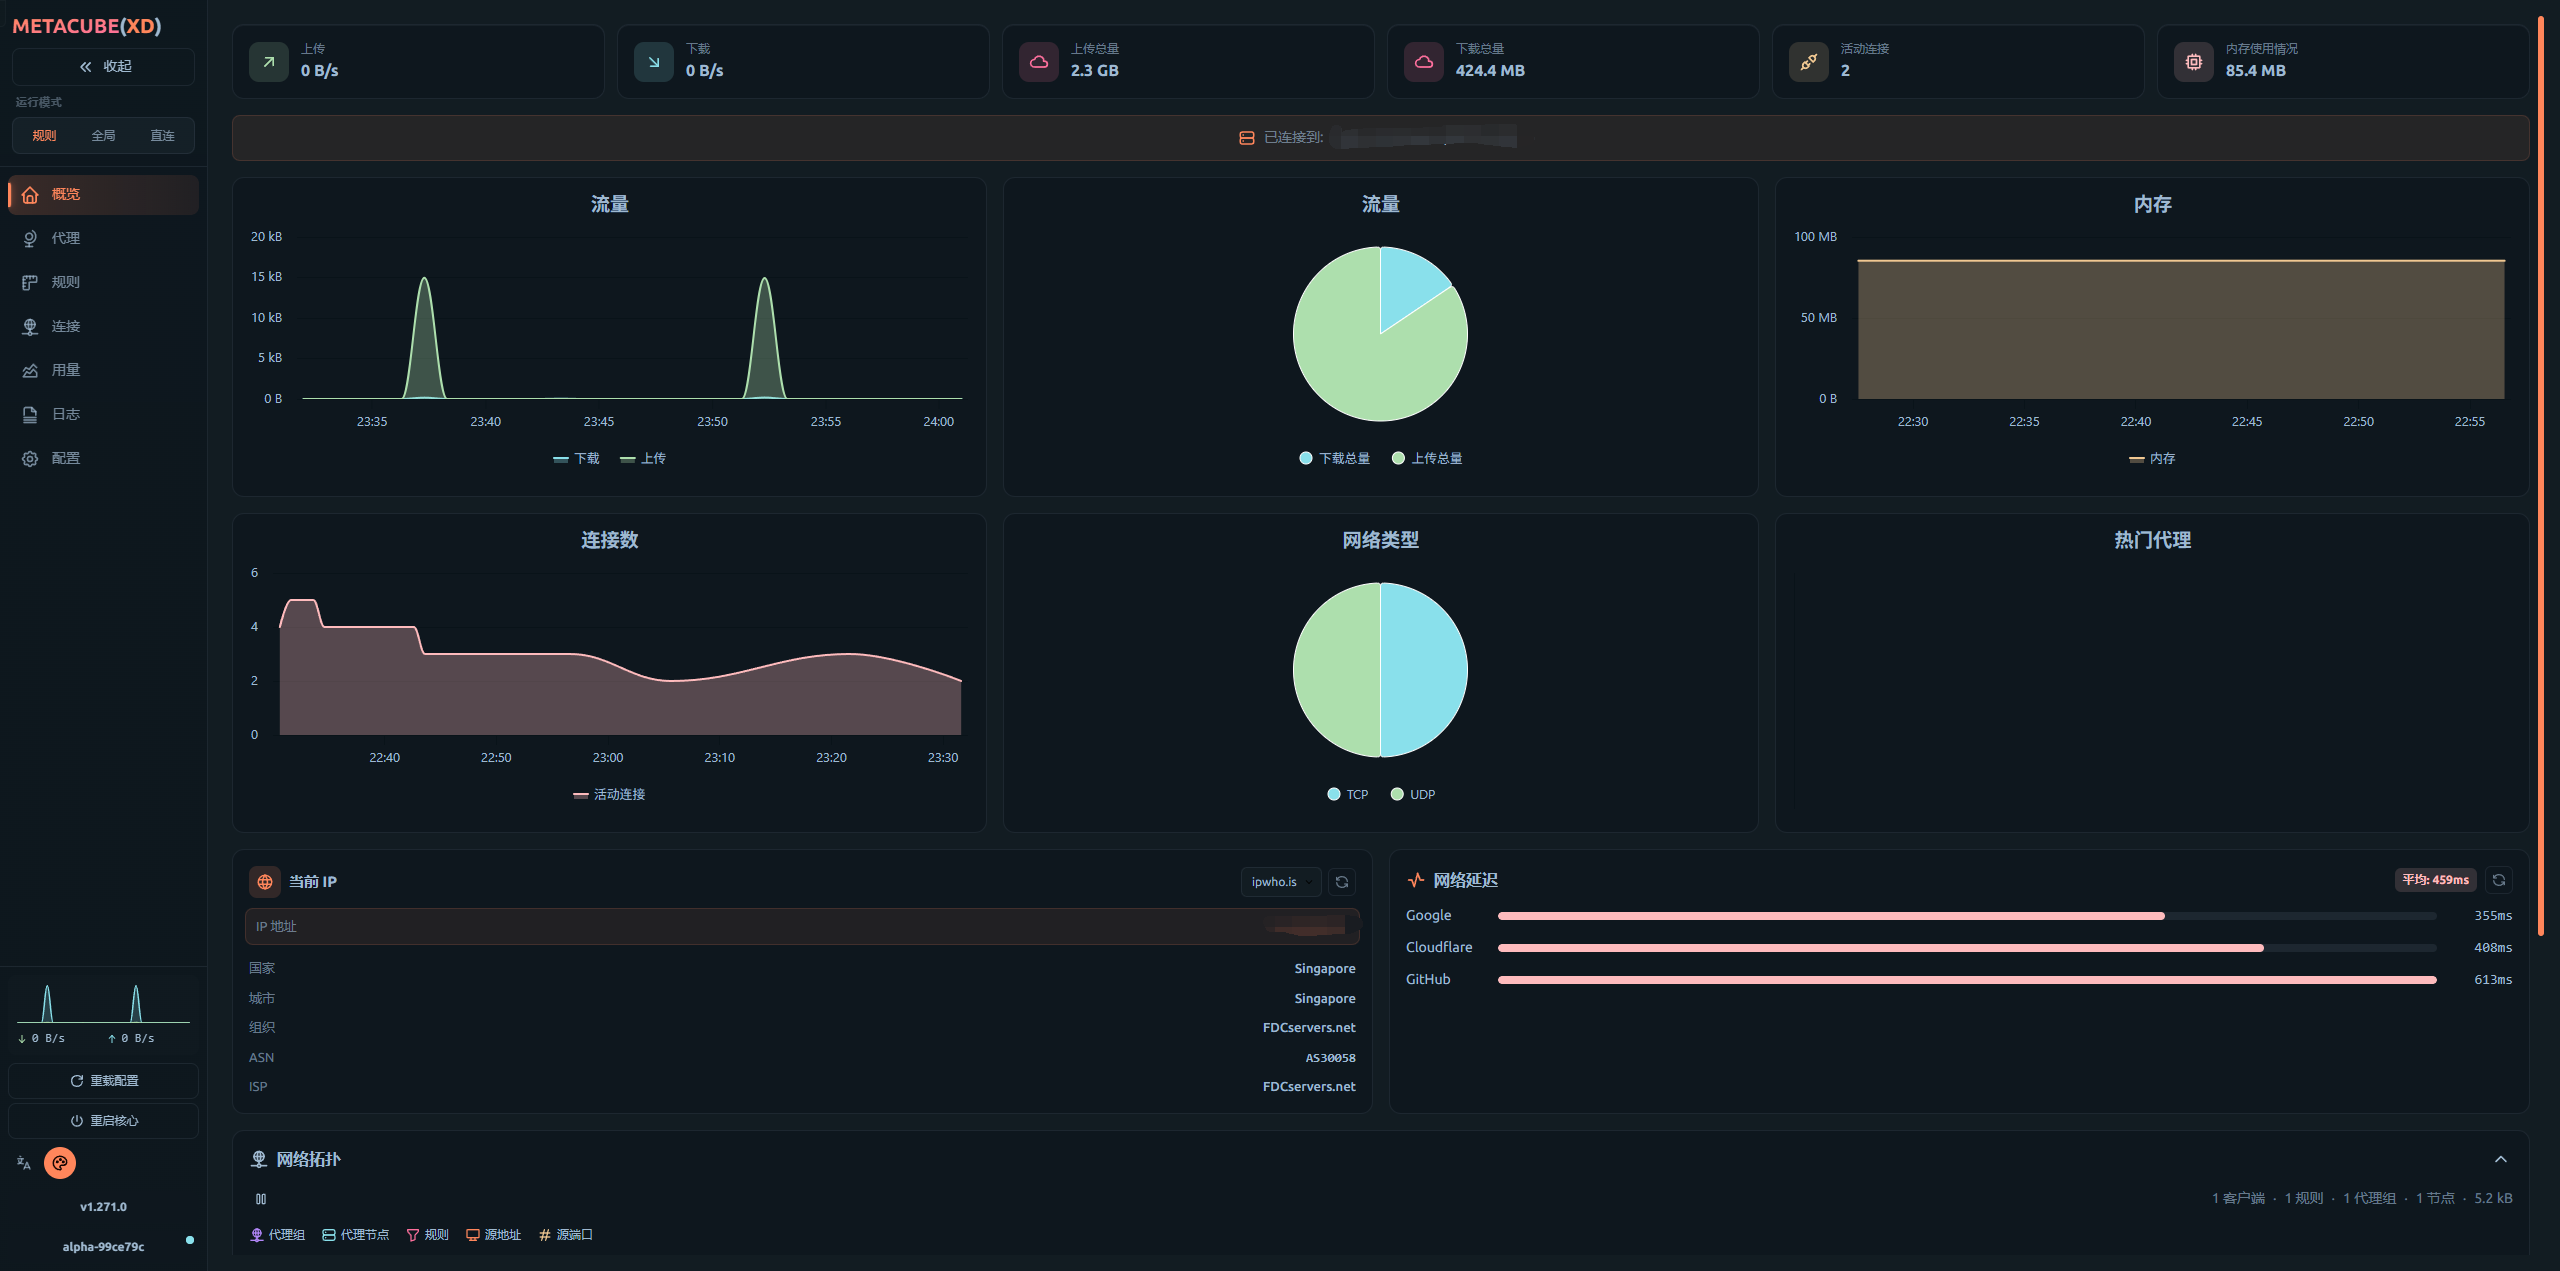
最终效果如下图: