手动搭建LNMP环境
操作场景
LNMP 环境是指在 Linux 系统下,由 Nginx + MySQL/MariaDB + PHP 组成的网站服务器架构。本文档介绍如何在服务器上手动搭建 LNMP 环境。
示例软件版本
本文搭建的 LNMP 环境软件组成版本及说明如下:
- Linux:Linux 操作系统,本文以 debian 12.6 为例。
- Nginx:Web 服务器,本文以 Nginx 1.22.1 为例。
- MariaDB:数据库,本文以 MariaDB 10.11.6 为例。
- PHP:脚本语言,本文以 PHP 8.2.20 为例。
操作步骤
步骤1:登录 Linux
根据实际操作习惯,选择其他不同的登录方式:如使用ssh登录、通过vnc登录等。
步骤2:安装 Nginx
- 确认源文件正常,执行以下命令。
1 | vim /etc/apt/sources.list |
- 确认源文件正常,按 i 切换至编辑模式,写入以下内容,或使用确认的内部、外部源地址。
1 | deb http://mirrors.tencentyun.com/debian bookworm main contrib non-free non-free-firmware |
按 Esc,输入 :wq,保存文件并返回。
执行以下命令,安装 nginx。
1 | sudo apt update |
- 执行以下命令,打开
default.conf文件,并填写对应申请域名的地址。
1 | sudo vim /etc/nginx/sites-enabled/default.conf |
按 Esc,输入 :wq,保存文件并返回。
执行以下命令检查语法并启动 Nginx,设置 Nginx 为开机自启动。
1 | sudo nginx -t |
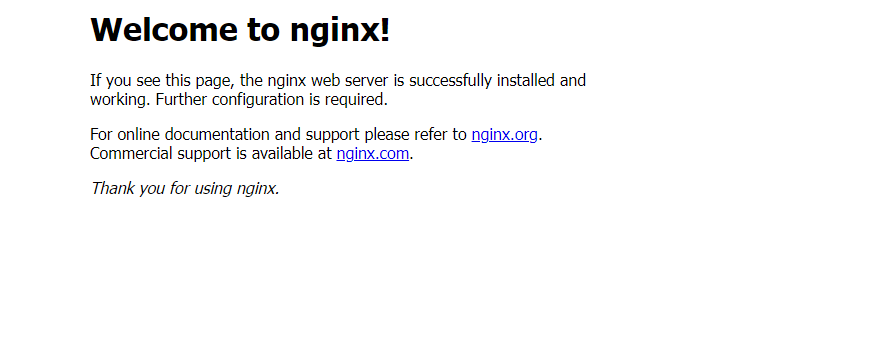
- 在本地浏览器中访问nginx中配置的域名或公网IP,查看 Nginx 服务是否正常运行
1 | http://云服务器实例的公网 IP 或配置的域名 |
显示如下,则说明 Nginx 安装配置成功。
步骤3:安装数据库
- 执行以下命令,查看系统中是否已安装 MariaDB。 如未安装可继续安装数据库
1 | sudo apt search mariadb | grep mariadb //查看系统中是否已安装 MariaDB |
- 执行以下命令,启动 MariaDB 服务,设置 MariaDB 为开机自启动。
1 | sudo systemctl start mariadb |
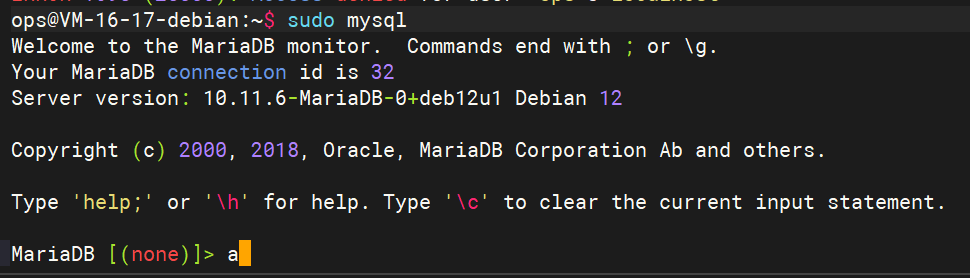
- 执行以下命令,验证 MariaDB 是否安装成功。
1 | sudo mysql |
显示结果如下,则成功安装。
- 执行以下命令,退出 MariaDB。
1 | MariaDB [(none)]> quit |
步骤4:安装配置 PHP
- 执行以下命令,安装 PHP 8.2 所需要的包。
1 | sudo apt search php-fpm \\查看软件源中php的版本 |
- 执行以下命令,验证 PHP 是否安装成功。
1 | php -v |
显示结果如下,则成功安装。

验证环境配置
当您完成环境配置后,可以通过以下验证 LNMP 环境是否搭建成功。
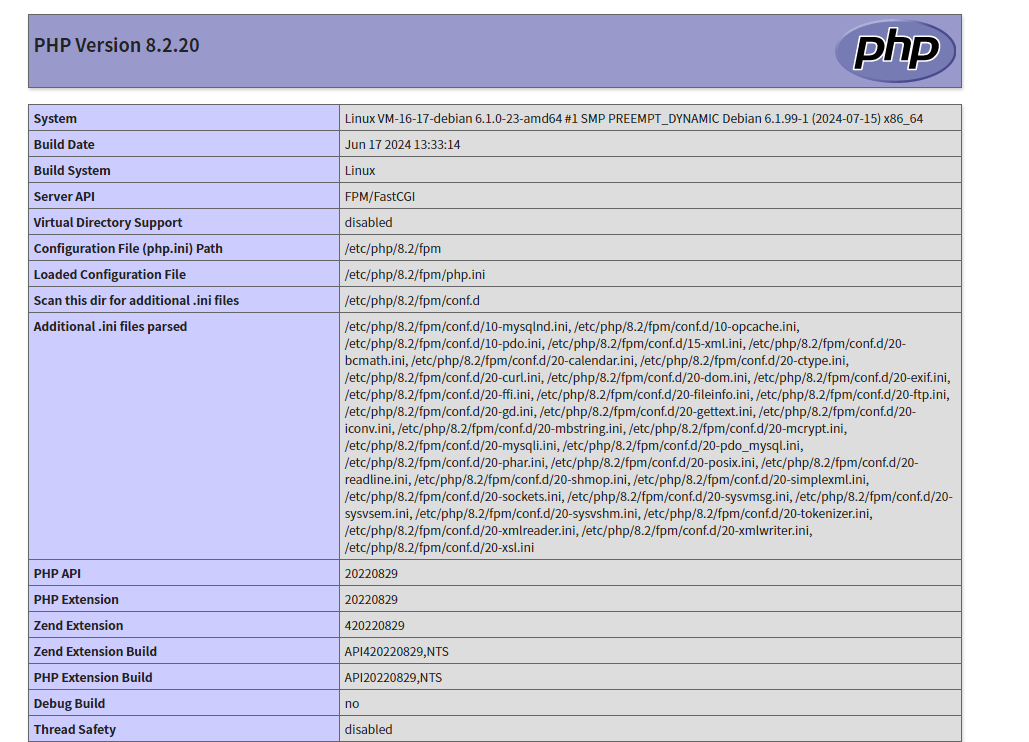
- 执行以下命令,创建测试文件。
1 | echo "<?php phpinfo(); ?>" | sudo tee /usr/share/nginx/html/index.php |
- 在本地浏览器中访问如下地址,查看环境配置是否成功。
1 | http://云服务器实例的公网 IP/index.php 或 http://nginx配置的域名/index.php |
显示结果如下,则说明环境配置成功。
本博客所有文章除特别声明外,均采用 CC BY-NC-SA 4.0 许可协议。转载请注明来源 丘比特的小屋!
相关推荐

2025-03-03
手动搭建 WordPress 个人站点(Linux)
WordPress 是一款使用 PHP 语言开发的博客平台,您可使用通过 WordPress 搭建属于个人的博客平台或个人网站。本文以 debian 12.6 操作系统服务器为例,手动搭建 WordPress 个人站点。

2025-03-29
Linux初始化以及系统性能调优
成功安装 Linux 系统后,系统能启动并运行,但仍需进行一些初始化设置,以确保安全性、稳定性和个性化。本文将详细介绍安装后应立即执行的几个关键步骤,助您快速上手并优化 Linux 环境。

2025-03-29
Linux启动流程
Linux操作系统的启动流程可分为以下几个关键阶段,综合硬件初始化、引导加载、内核加载及用户空间初始化等过程
评论
TwikooGiscus